AmbiScreen WiFiLED Tips

If you have wifi connection issues check that your wifi network is 2.4GHz only, it has short alphanumeric wifi network name without special characters (like e.g.apostrophes).

Colors are different? Eye contains LiveView page (accessible via web app on Eye). If color of your liveview leds is not correct, try to check what Eye sees. Everytime you navigate or refresh LiveView page, new image is grabbed. You can access this image at liveview page or directly via http://IP_of_eye/app/diagnose/liveview.jpg (replace IP_of_eye with current IP address of Eye device).
You can also go to Settings-LEDs of Eye and turn off color boosting with placing value 1.0. Or you can use other settings such as R,G,B values to adjust colors directly. Via webapp at Transform tab you can see these changes live (and later you can put these values in Settings-LEDs and save them to store it as default values).

AmbiScreen WiFiLED wifi access point is just for initial setup (change of initial settings after first boot) or for change of home wifi network credentials.
AmbiScreen WiFiLED OTA password is “ambiscreenota”. We recommend to change this password.

While real-rime data flows from AmbiScreen Eye to WiFiLED, web app is not available on WiFiLED (also when more additional requests are made from various devices in home network during real-time connection, WiFiLED reboot can occur).
If last LEDs on strip are not used, you can see residual colors on last led chips. This is ok and residual color can go away. You can hide them behind screen panel.
When device is used for long run (several days), it can reboot itself once daily to ensure best functionality. It is recommended to set no color for WiFiLED start sequence via Settings to RGB value 0,0,0 (default factory color is yellow-orange).

When Eye is used for controlling AmbiScreen WiFiLED, then WiFiLED’s web app is not available (real-time mode is activated). If you want to control WiFiLED with its own web app, simply turn of AmbiScreen Eye or set another IP of WiFiLED in Eye’s settings.

AmbiScreen Eye and WiFiLED can work standalone with internal web apps in both devices.

If you want to have static IP addresses for your devices, set it in your router DHCP table.

When electricity is lost in your home, manual unplug of AmbiScreen Eye and WiFiLED is recommended. Eye and WiFiLED can automatically reboot when used for longer time. This feature is fully automatic for performing maintenance.

On longer LED strips (longer than 2.5m) voltage drop may occur and it is normal.
AmbiScreen WiFiLED Recover factory defaults

Standard factory reset:
Connect to AmbiScreenWiFiLED network and click on Settings tab. Now you can change all settings in all pages as desired. Alternatively, you can open page Security & Update setup, tick “Factory reset” and click n Save & Reboot button.


Just if you forgot your password to AmbiScreenWiFiLED network (hard reset):
Turn off device from power (IMPORTANT: when turning off/unplugging device from power always remove from device jack at connector side of device – that is the side where led connector is located).
Plug power and after 2-3 seconds unplug power (repeat this 3 times). On the next boot factory defaults will be recovered. Use hard reset with caution! It can brick your device if done in wrong manner.

AmbiScreen WiFiLED First start

If you have wifi connection issues check that your wifi network is 2.4GHz only, it has short alphanumeric wifi network name without special characters (like e.g.apostrophes).

After first start AmbiScreen Eye opens its own wifi access point. Connect to this “AmbiScreenWiFiLED” wi-fi network with password “ambiscreen33”. Navigate to http://192.168.33.1 via your web browser and setup your AmbiScreen Eye device via Settings page (count of LEDs, credentials for your home wi-fi ).
When you set your own wifi credentials for your home wifi click on Save. It is recommended to manually unplug device from power for 30 seconds and then power it again. If device is not able to connect to your home wifi, repeat this step or check wifi credentials. After initial value change power-cycling is recommended.

Once your device is set we recommend to use web app at http://finder.ambiscreen.tv to find all your devices. AmbiScreen Finder is able to locate AmbiScreen Eye and AmbiScreen WiFiLED in your network. You can place Finder to your mobile home screen via “Add to Home screen” button in mobile browser. Via Finder you can open AmbiScreen device in your network. Finder needs to be in the same network as Eye and WiFiLED – it means you need to open Finder on device (e.g. phone, computer, …) which is connected to the same network as Eye and WiFiLED.

Via Finder you can click on AmbiScreen devices and it shows you internal web app of WiFiLED (you can also navigate to it directly via IP in web browser the same way), or internal web app of Eye.

AmbiScreen WiFiLED LED strip installation

Correct placing of the LED strip is very important to ensure that the final effect is correct. You should make sure that the LED stripe is mounted symmetrically and at a consistently equal distance from the wall behind your display. LED stripe should not be placed too close to the wall, as this will cause a “spot light” effect. The recommended distance for best effect is 4 -15 cm from the wall but it may vary depending on your display, placement, and wall color.

LED installation surface must be smooth, clean and dry. Do not cover ventilating holes of your display. The part of LED components cannot be fixed on the surface of the sharp edge. LED Strip should not be collided or crushed.
When placing the LEDs, you should consider the following factors: Display distance from the wall (the bigger the screen is, the closer the LEDs should be placed to the edge of the back cover of your screen). The minimum distance of the LEDs from the visible wall area (the part of the wall you can see when watching your display should be at least 4 cm, otherwise you may get a “spotlight” effect.

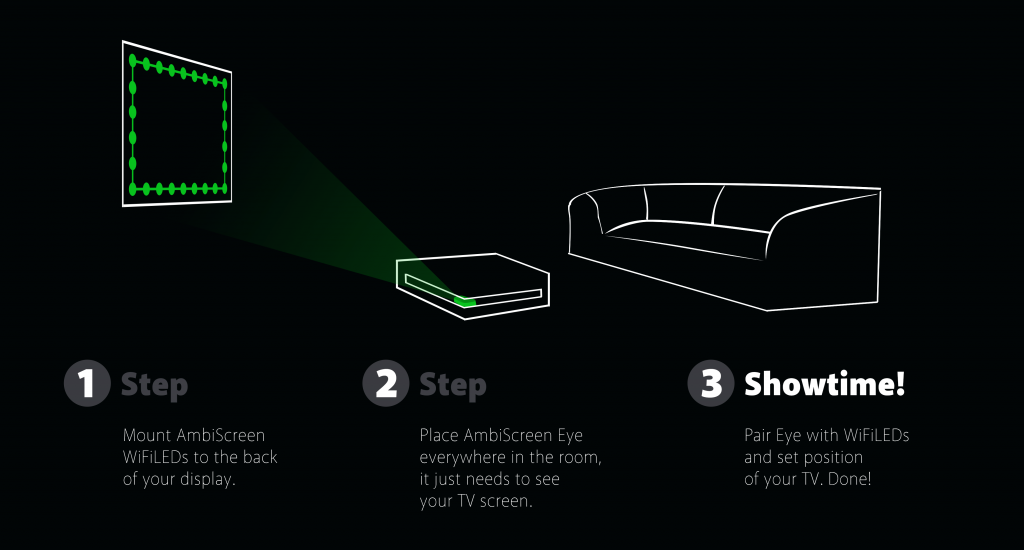
When placing your LED strip at the back of your display – start with first LED in bottom left corner (facing back of your display) and go up, right, down and left. The first LED is the one from the long black connector wire going to WiFiLED device. Fasten LEDs at the back side of your display with self adhesive tape (included on the back part of the LED strip).
Fasten LED corners very carefully and gently to avoid LED strip snap or break.
Recommendation: Gently bent the LED strip in corners and let corners dangle to prevent LED damage and unsticking from surface.
Your package may contain comfortable fixing adhesive squares and plastic ties for your convenience. Place it especially to corners and regularly along to LEDs to fix your LED strip properly. Fastening tape on the back side of LED strip is not designed for repeatable attachments.

AmbiScreen Eye Position

Put AmbiScreen Eye in the room on the place where the camera on the Eye has full view to the screen of your display.

You can adjust live view via web app in Settings->LiveView. Just select 4 edges of your screen on the image and click on Save button.

Optimal Eye distance is ~2.5m away from screen but you can even place it everywhere in the room with greater distance.

AmbiScreen Eye More advanced Config.json manual configuration

These settings are for advanced users. You can break functionality of your device. Anytime you can restore original values via Lite web app.

	/// Color manipulation configuration used to tune the output colors to specific surroundings. 
	/// The configuration contains a list of color-transforms. Each transform contains the 
	/// following fields:
	///  * 'channelAdjustment'
	///  * 'id'   : The unique identifier of the channel adjustments (eg 'device_1')
	///  * 'leds'   : The indices (or index ranges) of the leds to which this channel adjustment applies
	///             (eg '0-5, 9, 11, 12-17'). The indices are zero based.
	///  * 'pureRed'/'pureGreen'/'pureBlue' : The manipulation in the Red-Green-Blue color domain with the 
	///                           following tuning parameters for each channel:
	///  * 'temperature'
	///  * 'id'   : The unique identifier of the temperature (eg 'device_1')
	///  * 'leds'   : The indices (or index ranges) of the leds to which this temperature applies
	///             (eg '0-5, 9, 11, 12-17'). The indices are zero based.
	///  * 'red'/'green'/'blue' : The temperature manipulation in the Red-Green-Blue color domain with the 
	///                           following tuning parameters for each channel:
	///  * 'transform'
	///  * 'id'   : The unique identifier of the color transformation (eg 'device_1')
	///  * 'leds' : The indices (or index ranges) of the leds to which this color transform applies
	///             (eg '0-5, 9, 11, 12-17'). The indices are zero based.
	///  * 'hsv' : The manipulation in the Hue-Saturation-Value color domain with the following 
	///            tuning parameters:
	///            - 'saturationGain'  The gain adjustement of the saturation
	///            - 'luminanceGain'       The gain adjustement of the luminance
	///            - 'luminanceMinimum'    The minimum luminance (backlight)
	///  * 'red'/'green'/'blue' : The manipulation in the Red-Green-Blue color domain with the 
	///                           following tuning parameters for each channel:
	///            - 'threshold'       The minimum required input value for the channel to be on 
	///                                (else zero)
	///            - 'gamma'           The gamma-curve correction factor
	///
	/// Next to the list with color transforms there is also a smoothing option.
	///  * 'smoothing' : Smoothing of the colors in the time-domain with the following tuning 
	///                  parameters:
	///            - 'type'            The type of smoothing algorithm ('linear' or 'none')
	///            - 'time_ms'         The time constant for smoothing algorithm in milliseconds
	///            - 'updateFrequency' The update frequency of the leds in Hz
	///            - 'updateDelay'     The delay of the output to leds (in periods of smoothing)
	"color" :
	{
		"channelAdjustment" :
		[
			{
				"id"   : "default",
				"leds" : "*",
				"pureRed" :
				{
					"redChannel"   : 255,
					"greenChannel" : 0,
					"blueChannel"  : 0
				},
				"pureGreen" :
				{
					"redChannel"   : 0,
					"greenChannel" : 255,
					"blueChannel"  : 0
				},
				"pureBlue" :
				{
					"redChannel"   : 0,
					"greenChannel" : 0,
					"blueChannel"  : 255
				}
			}
		],
		"temperature" :
		[
			{
				"id"   : "default",
				"leds" : "*",
				"temperatureValues" :
				{
					"red"   : 255,
					"green" : 255,
					"blue"  : 255
				}
			}
		],
		"transform" :
		[
			{
				"id"   : "default",
				"leds" : "*",
				"hsl" :
				{
					"saturationGain"   : 1.0000,
					"luminanceGain"    : 1.0000,
					"luminanceMinimum" : 0.0000
				},
				"red" :
				{
					"threshold" : 0.0000,
					"gamma"     : 2.5000
				},
				"green" :
				{
					"threshold" : 0.0000,
					"gamma"     : 2.5000
				},
				"blue" :
				{
					"threshold" : 0.0000,
					"gamma"     : 2.5000
				}
			}
		],

		"smoothing" :
		{
			"type"            : "linear",
			"time_ms"         : 200,
			"updateFrequency" : 20.0000,
			"updateDelay"     : 0,
			"continuousOutput": true
		}
	},