AmbiScreen Eye More advanced Config.json manual configuration

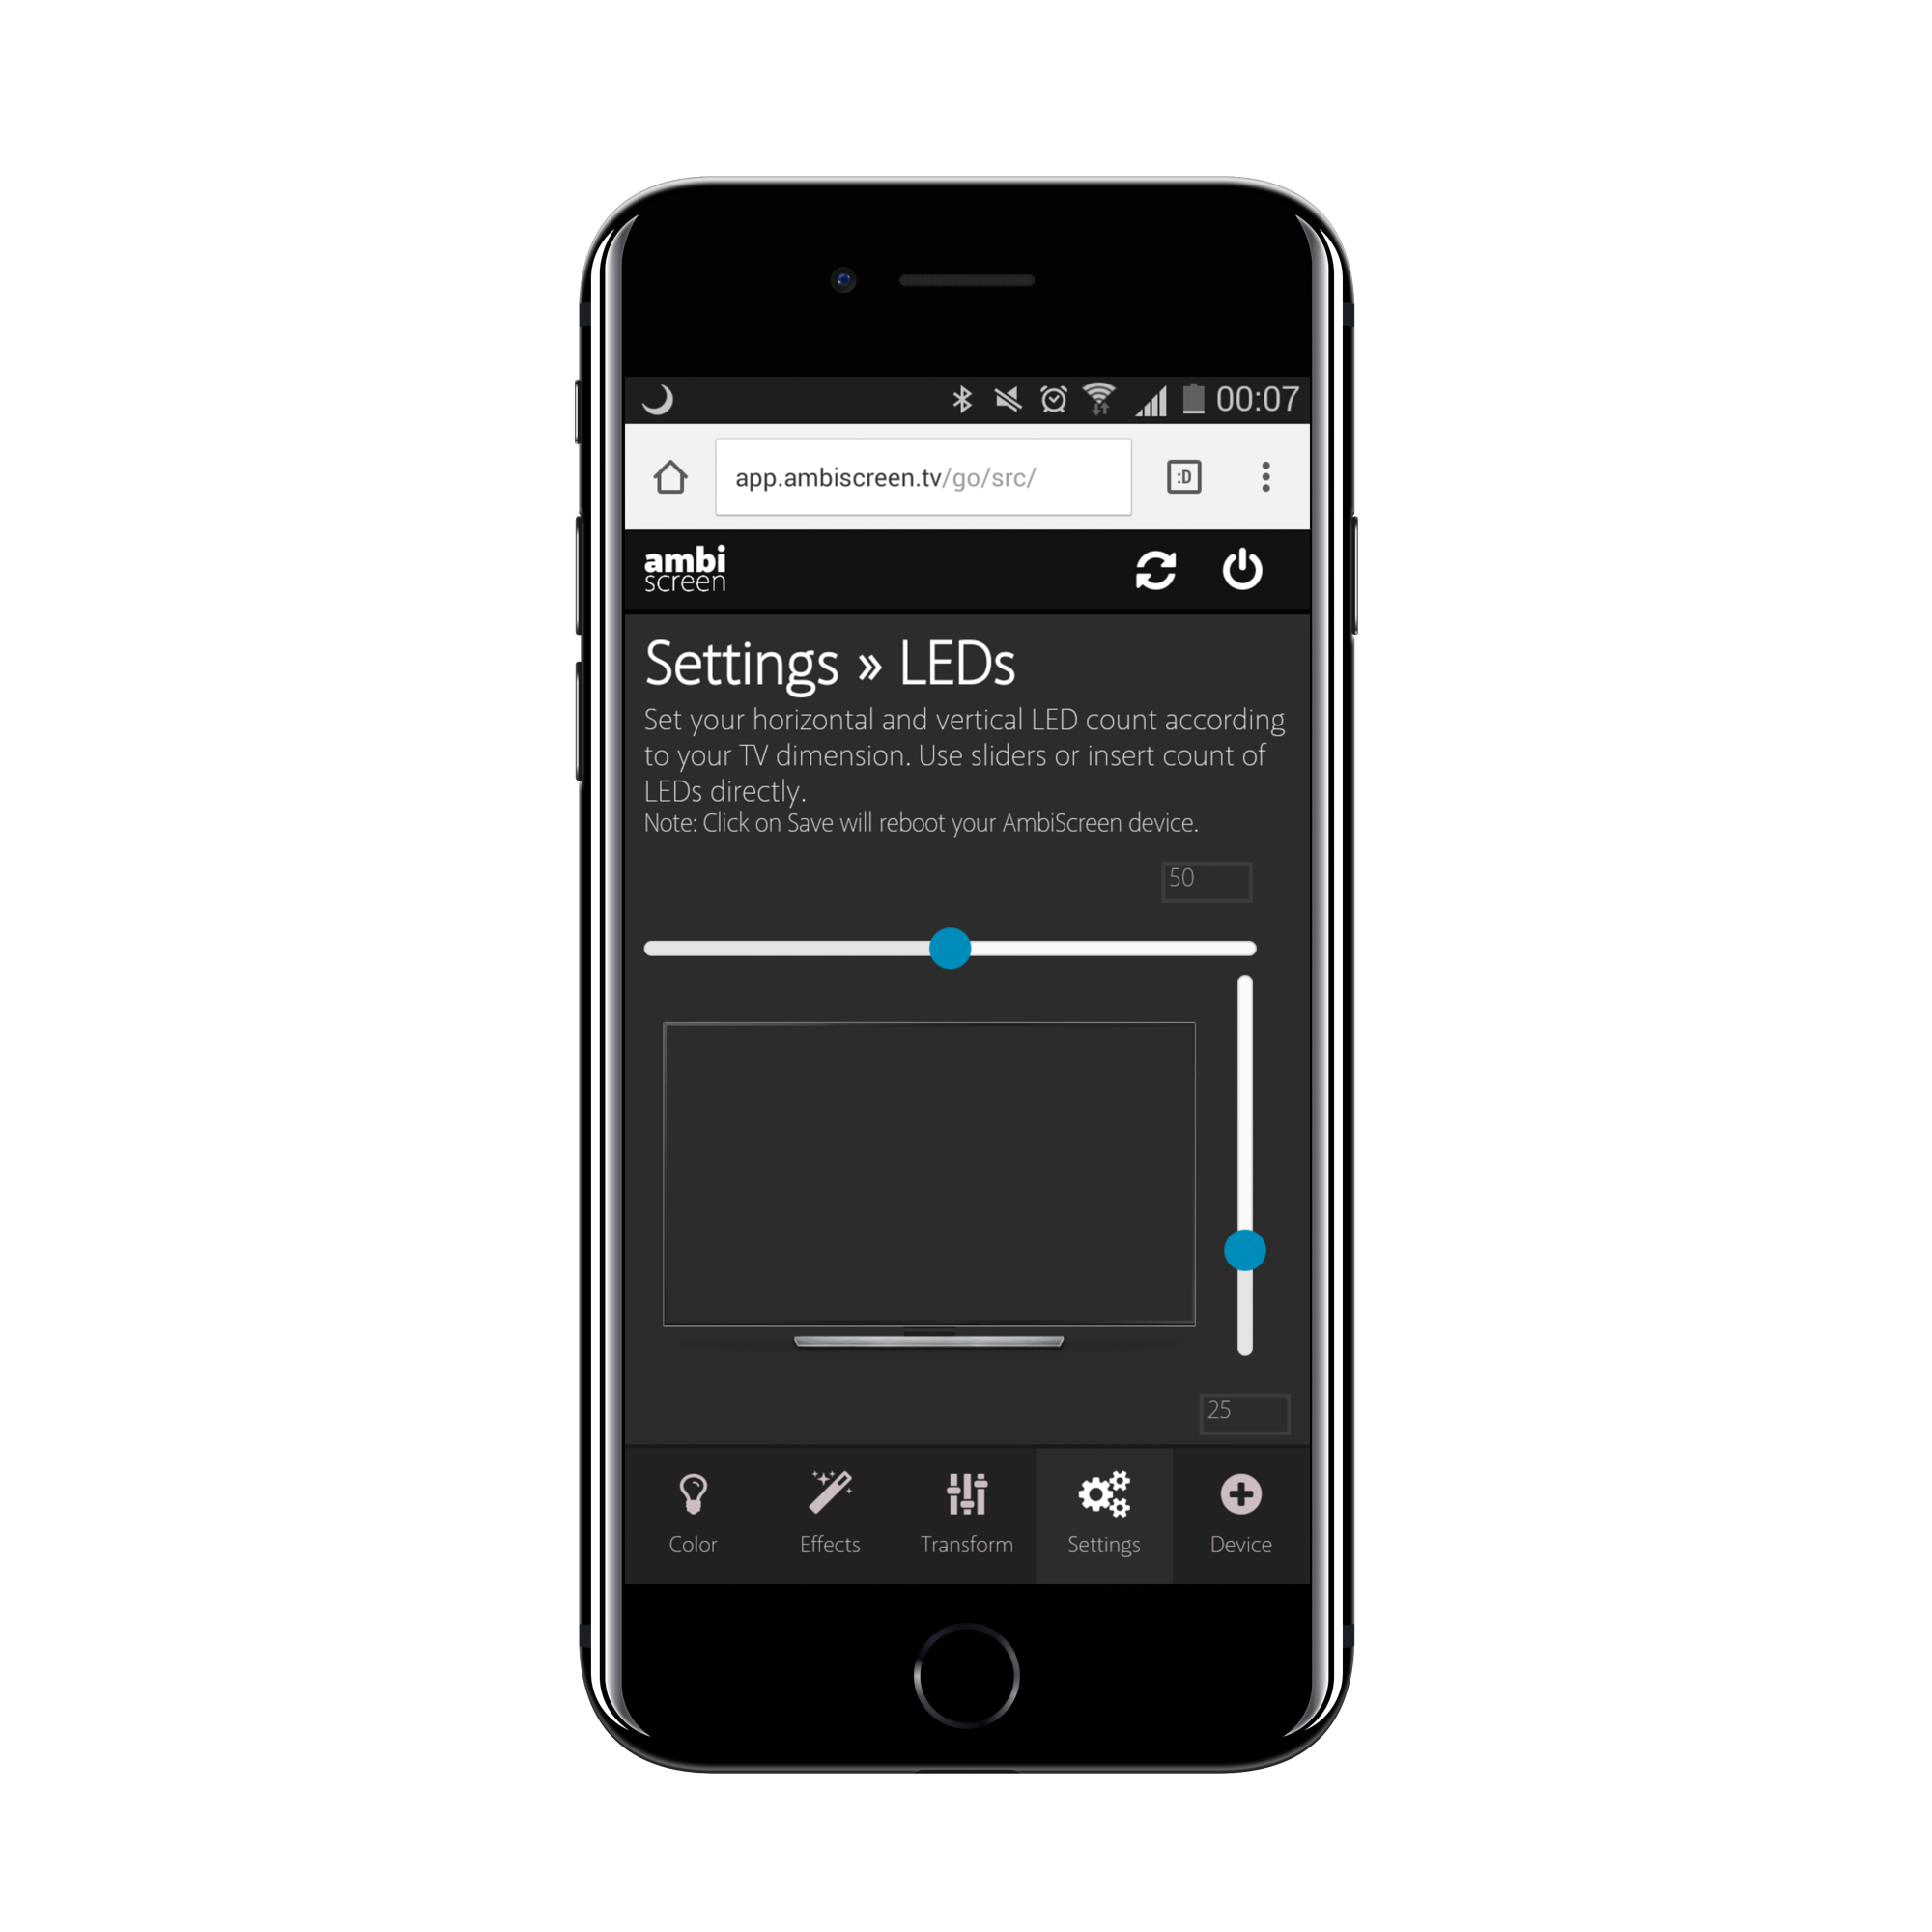
These settings are for advanced users. You can break functionality of your device. Anytime you can restore original values via Lite web app.

	/// Color manipulation configuration used to tune the output colors to specific surroundings. 
	/// The configuration contains a list of color-transforms. Each transform contains the 
	/// following fields:
	///  * 'channelAdjustment'
	///  * 'id'   : The unique identifier of the channel adjustments (eg 'device_1')
	///  * 'leds'   : The indices (or index ranges) of the leds to which this channel adjustment applies
	///             (eg '0-5, 9, 11, 12-17'). The indices are zero based.
	///  * 'pureRed'/'pureGreen'/'pureBlue' : The manipulation in the Red-Green-Blue color domain with the 
	///                           following tuning parameters for each channel:
	///  * 'temperature'
	///  * 'id'   : The unique identifier of the temperature (eg 'device_1')
	///  * 'leds'   : The indices (or index ranges) of the leds to which this temperature applies
	///             (eg '0-5, 9, 11, 12-17'). The indices are zero based.
	///  * 'red'/'green'/'blue' : The temperature manipulation in the Red-Green-Blue color domain with the 
	///                           following tuning parameters for each channel:
	///  * 'transform'
	///  * 'id'   : The unique identifier of the color transformation (eg 'device_1')
	///  * 'leds' : The indices (or index ranges) of the leds to which this color transform applies
	///             (eg '0-5, 9, 11, 12-17'). The indices are zero based.
	///  * 'hsv' : The manipulation in the Hue-Saturation-Value color domain with the following 
	///            tuning parameters:
	///            - 'saturationGain'  The gain adjustement of the saturation
	///            - 'luminanceGain'       The gain adjustement of the luminance
	///            - 'luminanceMinimum'    The minimum luminance (backlight)
	///  * 'red'/'green'/'blue' : The manipulation in the Red-Green-Blue color domain with the 
	///                           following tuning parameters for each channel:
	///            - 'threshold'       The minimum required input value for the channel to be on 
	///                                (else zero)
	///            - 'gamma'           The gamma-curve correction factor
	///
	/// Next to the list with color transforms there is also a smoothing option.
	///  * 'smoothing' : Smoothing of the colors in the time-domain with the following tuning 
	///                  parameters:
	///            - 'type'            The type of smoothing algorithm ('linear' or 'none')
	///            - 'time_ms'         The time constant for smoothing algorithm in milliseconds
	///            - 'updateFrequency' The update frequency of the leds in Hz
	///            - 'updateDelay'     The delay of the output to leds (in periods of smoothing)
	"color" :
	{
		"channelAdjustment" :
		[
			{
				"id"   : "default",
				"leds" : "*",
				"pureRed" :
				{
					"redChannel"   : 255,
					"greenChannel" : 0,
					"blueChannel"  : 0
				},
				"pureGreen" :
				{
					"redChannel"   : 0,
					"greenChannel" : 255,
					"blueChannel"  : 0
				},
				"pureBlue" :
				{
					"redChannel"   : 0,
					"greenChannel" : 0,
					"blueChannel"  : 255
				}
			}
		],
		"temperature" :
		[
			{
				"id"   : "default",
				"leds" : "*",
				"temperatureValues" :
				{
					"red"   : 255,
					"green" : 255,
					"blue"  : 255
				}
			}
		],
		"transform" :
		[
			{
				"id"   : "default",
				"leds" : "*",
				"hsl" :
				{
					"saturationGain"   : 1.0000,
					"luminanceGain"    : 1.0000,
					"luminanceMinimum" : 0.0000
				},
				"red" :
				{
					"threshold" : 0.0000,
					"gamma"     : 2.5000
				},
				"green" :
				{
					"threshold" : 0.0000,
					"gamma"     : 2.5000
				},
				"blue" :
				{
					"threshold" : 0.0000,
					"gamma"     : 2.5000
				}
			}
		],

		"smoothing" :
		{
			"type"            : "linear",
			"time_ms"         : 200,
			"updateFrequency" : 20.0000,
			"updateDelay"     : 0,
			"continuousOutput": true
		}
	},

How to reset Wi-Fi settings?

Maybe you mistyped your Wi-Fi password or you want to revert changes back. To change your Wi-Fi settings once your AmbiScreen box is not able to connect to your internal Wi-Fi network, follow these steps.

  1. connect your AmbiScreen device with LAN cable to your internal network.
  2. Your router in your internal network will assign new IP to your AmbiScreen device. Check your router’s DHCP table for assigned IP.
  3. Open AmbiScreen webapp and navigate to Settings » Wi-Fi.
    Or navigate your webbrowser with http://your_device_IP/ and choose Lite settings webapp (or http://your_device_IP/app/settings_wifi.php in case you didn’t do firmware update) and navigate to Settings » Wi-Fi.
  4. There you can change your Wifi settings and Save changes.

AmbiScreen Webapp and Lite settings webapp

AmbiScreen can be controlled from any device (mobile, tablet, pc, Mac, desktop, etc.) and any OS via webbrowser without need to install any app.

There are two standard ways how to control it – AmbiScreen Webapp and Lite settings webapp.


AmbiScreen Webapp
AmbiScreen Webapp is available at http://app.ambiscreen.tv (via webbrowser). To establish connection with your device via webapp navigate to “Device” tab. Then you can find AmbiScreen device by clicking on “Detect” (please, be patient, detection can take few seconds up to minutes to finish according to your network).

Or you can set connection to your device  manually. Click on “+” sign (right top) and insert Name for your device and IP to Address field. Then click  “Add”.

Your browser stores these settings for future use. You don’t need to setup connection settings next time you open browser again.


Lite settings webapp
AmbiScreen Lite settings webapp is available at http://your_device_IP (via webbrowser). This webapp is just lite version and the main purpose is to be able to access basic settings.

How to restart my device?

It is possible to restart your device in several ways.

  1. Use webapp and click on “Restart” under Settings.
    or
  2. Use Lite settings webapp and click on “Restart” under Settings.or
    or
  3. Navigate to http://your_device_IP/restart/ via webbrowser.
    or
  4. Unplug your device from power and replug it after few seconds.

How to switch off/on LEDs?

If you need to switch your LEDs off for longer time, you can use webapp to do it and tap on Power icon to switch LEDs off (blue circle, the right one button)..

When you want to turn on LEDs again, tap on “Refresh” button.
Switching back from static color or effects to live mode is done by taping the same “Refresh” button (blue circle, the left one button).

Note: We recommend to unplug your device from electricity when you don’t use it for longer time.

How to switch between color modes, effects and live mode?

You can choose between static color, color effects and live mode via webapp.

Switching between static color and color effects is possible by taping selected color on color wheel or choosing preferred light effect from the list of Effects. If you need to go back to live video mode, click on “Refresh” switching button (blue circle, the left one button).

How to recover LED default settings?

Sometimes you may need to recover factory settings for your LEDs.

Simply navigate via webapp or Lite settings webapp at Settings » LEDs page and click “Recover default values”. Factory default settings for LEDs will be recovered and your device reboots to take these settings in action.


Picture Diagnose & Config file download

Picture Diagnose feature at Settings page is here to help you fine tune AmbiScreen settings according to your hardware display/player setup when navigating to Settings » Diagnose page (accessible via webapp and Lite settings webapp).

Two main features in Diagnose are available – live Screenshot preview and option for downloading Configuration file.

Screenshot preview
If you want to check what video image your device is processing for LED colors, click on “Screenshot preview” button. You can fine tune this screenshot, just fill in your custom values, then click on “Screenshot preview” button. You will see screenshot with your custom values.

Note: When you want to check screenshot with these settings, it is necessary to have your video source plugged in.

All values can be fine tuned, such as image width, height, frameDecimation, sizeDecimation, cropping and color signal thresholds.

	///  * input           : V4L2 input to use [default=0]
	///  * standard        : Video standard (no-change/PAL/NTSC) [default="PAL" worldwide]
	///  * width                : V4L2 width to set [default=-1]
	///  * height               : V4L2 height to set [default=-1]
	///  * frameDecimation      : Frame decimation factor [default=2]
	///  * sizeDecimation       : Size decimation factor [default=8]
	///  * priority             : Hyperion priority channel [default=900]
	///  * mode                 : 3D mode to use 2D/3DSBS/3DTAB (note: no autodetection) [default="2D"]
	///  * cropLeft             : Cropping from the left [default=0]
	///  * cropRight            : Cropping from the right [default=0]
	///  * cropTop              : Cropping from the top [default=0]
	///  * cropBottom           : Cropping from the bottom [default=0]
	///  * redSignalThreshold   : Signal threshold for the red channel between 0.0 and 1.0 [default=0.0]
	///  * greenSignalThreshold : Signal threshold for the green channel between 0.0 and 1.0 [default=0.0]
	///  * blueSignalThreshold  : Signal threshold for the blue channel between 0.0 and 1.0 [default=0.0]

When you are satisfied with your results, please, fill in the same values on Settings » LEDs page and click “Save” to take effect the new settings.  Your device will reboot with new settings.

Your LEDs turn off while generating screenshot.  After taking screenshots you will need to click on “Restart” button to reboot your device and turn on your LEDs again.


Downloading Configuration file
If you need to contact AmbiScreen support, we can ask you to send us this file. To download it just simple click on “Download configuration file”.

How to adjust video settings for my setup with Diagnose interface?

You can fine tune AmbiScreen settings according to your hardware display/player setup when navigating to Settings » Diagnose page (accessible via webapp and Lite settings webapp).

Screenshot preview
If you want to check what video image your device is processing for LED colors, click on “Screenshot preview” button. You can fine tune this screenshot, just fill in your custom values, then click on “Screenshot preview” button. You will see screenshot with your custom values.

Note: When you want to check screenshot with these settings, it is necessary to have your video source plugged in.

All values can be fine tuned, such as image width, height, frameDecimation, sizeDecimation, cropping and color signal thresholds.

	///  * input           : V4L2 input to use [default=0]
	///  * standard        : Video standard (no-change/PAL/NTSC) [default="PAL" worldwide]
	///  * width                : V4L2 width to set [default=-1]
	///  * height               : V4L2 height to set [default=-1]
	///  * frameDecimation      : Frame decimation factor [default=2]
	///  * sizeDecimation       : Size decimation factor [default=8]
                                      1 or 8 (according to hardware version of your device - for v.1.1 we strictly recommend 8, for v.1.0 we recommend 1-8)
	///  * priority             : Hyperion priority channel [default=900]
	///  * mode                 : 3D mode to use 2D/3DSBS/3DTAB (note: no autodetection) [default="2D"]
	///  * cropLeft             : Cropping from the left [default=0]
	///  * cropRight            : Cropping from the right [default=0]
	///  * cropTop              : Cropping from the top [default=0]
	///  * cropBottom           : Cropping from the bottom [default=0]
	///  * redSignalThreshold   : Signal threshold for the red channel between 0.0 and 1.0 [default=0.0]
	///  * greenSignalThreshold : Signal threshold for the green channel between 0.0 and 1.0 [default=0.0]
	///  * blueSignalThreshold  : Signal threshold for the blue channel between 0.0 and 1.0 [default=0.0]

When you are satisfied with your results, please, fill in the same values on Settings » LEDs page and click “Save” to take effect the new settings.  Your device will reboot with new settings.

Your LEDs turn off while generating screenshot.  After taking screenshots you will need to click on “Restart” button to reboot your device and turn on your LEDs again.


Setup for your LEDs

Here you can find values and description for your AmbiScreen LED strip for Settings » LEDs (accessible via webapp and Lite settings webapp).

AmbiScreen LED processing is based on Hyperion project, as well as values below.

LED count: First of all you will need to set horizontal and vertical LED count with value sliders or simply type in number count. The remaining LEDs will stay unused and turned off.

Input signal: You can choose which signal to process, digital HDMI video or analog video over CVBS/RCA cinch/SCART.

Black border detection: The black border configuration, contains the following items:

	///  * enable    			: true if the detector should be activated
	///  * threshold 			: Value below which a pixel is regarded as black (value between 0.0 and 1.0)
	///  * unknownFrameCnt		: Number of frames without any detection before the border is set to 0 (default 600)
	///  * borderFrameCnt		: Number of frames before a consistent detected border gets set (default 50)
	///  * maxInconsistentCnt 	: Number of inconsistent frames that are ignored before a new border gets a chance to proof consistency
	///  * blurRemoveCnt		: Number of pixels that get removed from the detected border to cut away blur (default 1)
	///  * mode 				: Border detection mode (values=default,classic,osd)


V4L2:
Configuration for the embedded V4L2 grabber

	///  * input           : V4L2 input to use [default=0]
	///  * standard        : Video standard (no-change/PAL/NTSC) [default="PAL" worldwide]
	///  * width                : V4L2 width to set [default=-1]
	///  * height               : V4L2 height to set [default=-1]
	///  * frameDecimation      : Frame decimation factor [default=2]
	///  * sizeDecimation       : Size decimation factor [default=8]
                                      1 or 8 (according to hardware version of your device - for v.1.1 we strictly recommend 8, for v.1.0 we recommend 1-8)
	///  * priority             : Hyperion priority channel [default=900]
	///  * mode                 : 3D mode to use 2D/3DSBS/3DTAB (note: no autodetection) [default="2D"]
	///  * cropLeft             : Cropping from the left [default=0]
	///  * cropRight            : Cropping from the right [default=0]
	///  * cropTop              : Cropping from the top [default=0]
	///  * cropBottom           : Cropping from the bottom [default=0]
	///  * redSignalThreshold   : Signal threshold for the red channel between 0.0 and 1.0 [default=0.0]
	///  * greenSignalThreshold : Signal threshold for the green channel between 0.0 and 1.0 [default=0.0]
	///  * blueSignalThreshold  : Signal threshold for the blue channel between 0.0 and 1.0 [default=0.0]


These settings help you to adjust your AmbiScreen device for your specific setup. Just consult our wiki in article how to adjust your setup with Diagnose feature.

Sample values for black border detection, the right image processing and auto turn-off blue LEDs after few seconds while no input signal is detected (values can be adjusted for your specific hardware setup individually):

Black border
Enable: Yes
Threshold: 0,17
Mode: default
unknownFrameCnt: 600
borderFrameCnt: 50
maxInconsistentCnt: 10
blurRemoveCnt: 1

V4l2
Standard: (PAL, worldwide)
width: 720
height: 576
frameDecimation: 1
sizeDecimation: 1 or 8 (according to hardware version of your device - for v.1.1/v.1.2 we strictly recommend 8, for v.1.0 we recommend 1-8)
priority: 900
mode: 2D
cropLeft: 24
cropRight: 24
cropTop: 10
cropBottom: 10

V4l2 Signal Threshold
Red: 0,2
Green: 0,4
Blue: 1

Another often used great settings (these values can be adjusted to best fit your current video conditions). It is ok to experiment and adjust these values exactly for your devices :

V4l2
width: 90
height: 72
frameDecimation: 1
sizeDecimation: 1
cropLeft: 24
cropRight: 24
cropTop: 10
cropBottom: 10

No signal detection will turn off blue LEDs after few seconds when no input signal is detected. After few hours of no signal, blue LEDs may turn on for few seconds for signal detection again, and then turn itself off (if no signal is detected). If no signal detection turned LEDs off and then video signal becomes available again, device will respond automatically.

You are free to play with these values and tune it up for your specific hardware setup. Side effects such as flickering or pulsating are caused just by these settings so you need to tweak it sensitively.